

Using DreamHost Cloud Backup with SyncBackPro
Author: Kostas Tsakiridis, 2BrightSparks Pte. Ltd.
SyncBackPro has the capability to utilize DreamHost’s cloud storage service (DreamObjects) for backup purposes via S3 compatibility mode. This article will show the steps required to create a backup profile targeting an existing DreamObjects bucket.
If you don't have an account, you'll first need to create one.
Once your account is created, or you have logged in, you'll need to create a bucket. A bucket is like a storage drive. It's a container to put your files into. See the link below if you need more information on how to create a bucket:
https://help.dreamhost.com/hc/en-us/articles/215321178
In order to follow through this article, you will need to prepare and possess a pair of Access and Secret keys. You may read the following link on how to create such keys:
https://help.dreamhost.com/hc/en-us/articles/215986357
Creating a DreamObjects Cloud profile in SyncBackPro
Once you've created a bucket, and have your Access and Storage keys, you can begin creating a profile in SyncBackPro to use that bucket:
1. Start SyncBackPro and create a new profile using the Profile Creation Wizard (Profiles > New, or press Ctrl-N). Follow the on-screen prompts to provide your profile with a name and to select a profile type (Backup, Synchronize or Mirror).
2. On the location selection stage, click on either the Source or Destination dropdown list and select Amazon S3 or compatible service. DreamObjects is an AWS S3 compatible service therefore SyncBackPro will access it as such.
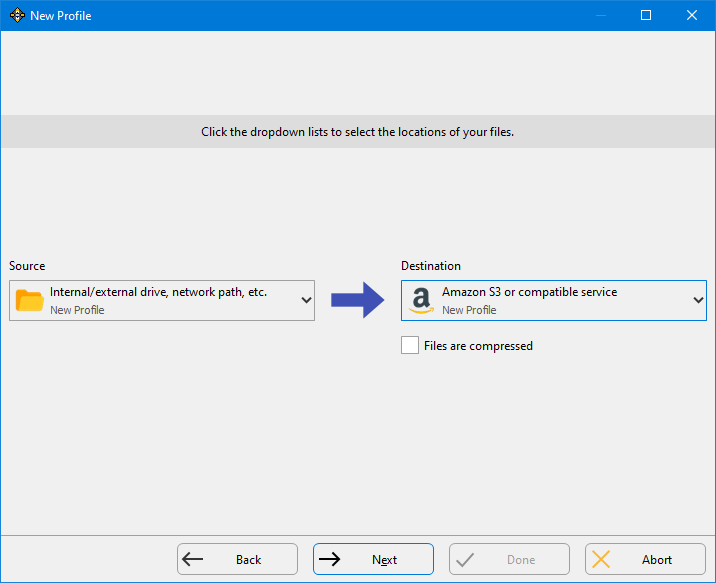
You can set Amazon S3 or compatible service as either your Source or your Destination, depending on whether you are backing up to or from the cloud storage.
3. At the Cloud Connection Details stage, you will need to fill in your DreamObjects Access Key ID and Secret key (which you got from step 1 above). To avoid mistakes we recommend copying (Ctrl-C) and pasting (Ctrl-V) the keys.
4. Enable the S3 compatible service checkbox and select objects-us-east-1.dream.io from the Service URL drop-down list.
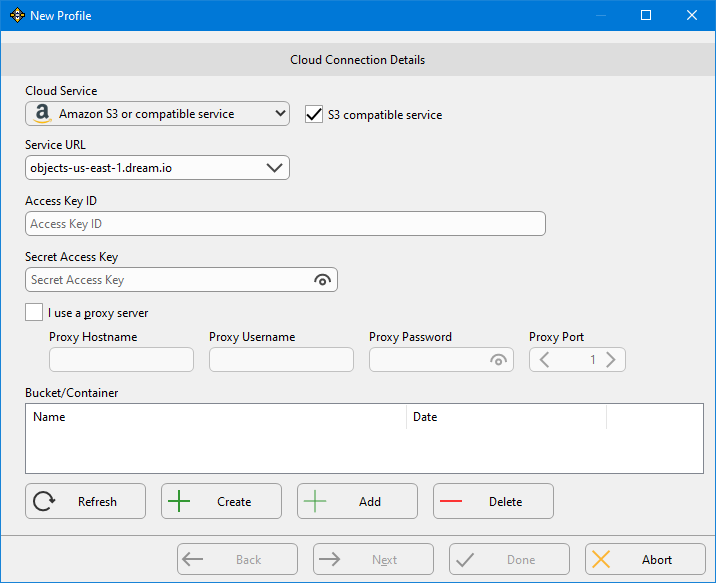
5. Click the Add button, under the Bucket/Container list box, to add your existing bucket to the list and use it. Buckets are required to store your files and folders and SyncBackPro expects you have already a bucket available for use with a DreamObjects cloud profile (as explained in step 1 above).
6. Click Done to complete the profile setup. You can now run the profile or schedule it to run unattended and automatically (set-and-forget).
Conclusion
With this guide, you have successfully created and set up a DreamObjects cloud profile in SyncBackPro.
SyncBackPro developed by 2BrightSparks offers a convenient and effective way to backup files between your system and your cloud storage servers.
In addition to this guide, you may also be interested in reviewing other cloud backup articles on our site.
2BrightSparks also features hundreds of articles in our Support Knowledge Base which you may find valuable.
Noted Customers
© 2003-2024 2BrightSparks Pte. Ltd. | Home | Support | Privacy | Terms | Affiliate Program